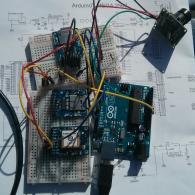
Arduino Setup
Over the past couple of weeks, the team finalized the technical setup, compacted the system, and fixed some problems with logging data onto the SD card reader. There were two setups for the Arduino unit on the receiver end. The Arduino was connected to a receiver board, which was activated by the key fob (wristband radio beacon) that transmitted the signal. In one setup, the Arduino was also connected to the SD card reader and the camera; in the other setup, the GPS unit replaced the camera.
When the GPS unit and the camera were each connected separately to the Arduino, they gathered GPS coordinates and images, respectively. This data would then be logged onto the SD card reader, but the team encountered some difficulties in doing so. The team needed to find a better way to alter the code of the GPS and camera so that the data collected would be directly sent to the SD card. To do this, the team consulted some of their mentors and came up with ideas on how to better set up the code's information. Then, trial-and-error testing was done to find the right alternatives to the code. After the changes were made, the team was able to have the GPS information and the camera's JPEG picture stored onto the SD card.
Regarding the camera, when the key fob is pressed, the receiver antenna picks up the signal and triggers the camera to take a picture. Then, the JPEG photo file is saved onto the SD card. Regarding the GPS unit, the latitude/longitude information as well as the time and date are stored onto the SD card. Using the keyfob to activate the GPS unit will be the next testing procedure.
The team recently connected both the GPS unit and camera to the SD card breadboard, compacting the components into one functional system. Soon, the system will further be compacted in order to reduce the amount of wires so it can be mounted onto the quadcopter.